Blog
Loopcloud 7.4: How to Use Our New MIDI Features
11 Dec '2024
Make the most of your newfound access to tens of thousands of MIDI files, which give you everything from melodics to drums to basslines to leads

Through thick and thin, Loopcloud has been there for you, providing millions of audio samples, all synced perfectly to your DAW project in tempo and in key. But what about MIDI?
Loopcloud has actually been able to deal with MIDI for a while. Put the Loopcloud plugin on a MIDI channel or Instrument track in your DAW, and you can play back one-shot samples (once selected) live, for demonstration purposes. And we’ve also been providing MIDI files via Loopmasters, and some via Loopcloud, for a while now. So what’s changing?
What’s new in this Loopcloud update?
With this update of Loopcloud, we’ve introduced more MIDI files that are now available for download, and in true Loopcloud fashion, we’ve provided more ways of auditioning and trying them out before you even own them.
Search Loopcloud using the MIDI or MIDI Files tag, and you’ll have access to over 150,000 MIDI files, all categorised for their native key, their instrument and their genre.
MIDI files work like any other files in Loopcloud, in that you can favourite them, own them for points, and drag them out straight into your DAW for use.
Searching and accessing MIDI files on Loopcloud
A quick way to start browsing for MIDI files on Loopcloud is to use the MIDI or MIDI Files tag while searching, exactly as you would when searching for many other things. You’ll also find the MIDI tag next to the WAV tag in the commonly accessible tags.
Below, we’re opening up the search by searching for MIDI and Keyboard parts. Let’s see what we turn up…

Auditioning MIDI files with six presets
Once you choose a MIDI file in Loopcloud, you can also preview its sound using one of six voices. If we press play in the Loopcloud app or by playing in a connected DAW, we get to hear the file.

By default, the preview sound as set to a Saw wave, but we can also choose to hear it as a Pluck, a Pad, a Filtered Saw, Basic sine wave or Drum kit by selected another sound in the menu.

Working with key and tempo with MIDI files
Loopcloud’s Pitch Lock functionality is a great thing to use with audio samples, and it’s just as great with MIDI. Once you’ve chosen a specific key you’re working in, all files you preview will be presented in that key. This means that no matter what key the MIDI file was originally in, it will conform to your destination once it’s set.

The same goes for tempo – the MIDI file will automatically conform to your currently selected tempo, whether that’s been set by a connected DAW, or just in the standalone app.
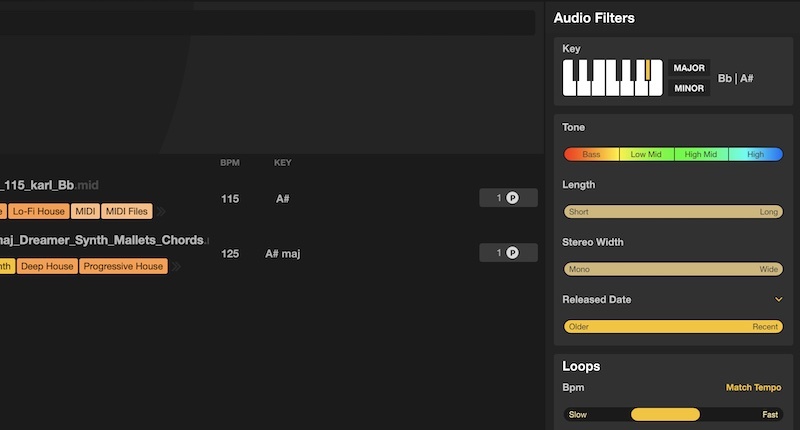
As well as changing the key and tempo of a file you’ve found, you can search exactly for the specific tempo and key of what you’re searching for.
Long-time users may be pleased to know that some of the ‘Audio Filters’ now work for searching MIDI files. You can search by the exact key you’re looking for and a tempo range – just like you can when finding audio samples.

Why categorise MIDI files for key and tempo?
MIDI files are just pure data. Unlike with audio, which can have artefacts introduced if stretched or shifted too much, MIDI is just a set of instructions that tells a sound generator like a synth what to play. So why do we even think about the default key or tempo of the file?
While it mostly doesn’t matter what the original file’s tempo and key were, it can sometimes play a part. A Drum & Bass drum loop would technically work at a slower tempo, but the speed of the original lends itself to short, punchy drum sounds rather than slower, lingering ones. This doesn’t have to carry through to your project, but it’s good to know the intended tempo of the original file in case it does.
Loopcloud also has MIDI for specific instruments, for example the cello, which has a particular range of notes it can play. In these situations, it’s useful to keep the original key baked into the file so that this information doesn’t get lost.
Altering MIDI playback in the Edit window
Loopcloud’s Edit panel is useful for audio samples, and there’s some mileage for MIDI there too. You can use the Start and End functions to select just a region that you want to keep, and this region will become the new loop.

Using MIDI with Loopcloud’s Multitrack functions
While we’re in the Edit window, we can open up a second track to play another MIDI synth part in parallel. This time we look for a bassline in the same key as our current stab sound, or we can ensure it’s playing in key by locking the pitch to our previously selected part.

Export options for MIDI in Loopcloud
Later on, we’ve got four parts loaded into our multitrack Loopcloud project, all playing different presets for demonstration. Let’s export these files for use in our DAW.
Using the default export option, like when using Loopcloud for audio samples, will create a WAV file loop of your multitrack mix, for use as a single audio file in your DAW. That might not be what you’re looking for with MIDI.

Another option is to click the arrow on the Export button, and select Processed Separate Files in the dropdown that you’ll find in the Export Preferences dialog.

Update Loopcloud for the MIDI experience
You can get the newest Loopcloud installer by hitting the Download button at the very top of this page, or by launching your current Loopcloud app, clicking Help (in the menu bar) and Check For Updates.

